I have seen tons of editing tutorials out there that are NLE specific. I watch them all the time. However, I rarely see any basic editing tutorials that are useful for any NLE. In order to fill the void, I present my video-editing tips series, good for the newbie, and potentially useful to the pro.
If you are creating videos for the web, then this tutorial is for you. I’m going to go over a tip I use to increase production value while capturing live events or action, and cutting to music.
In order to take advantage of this tip, there are a few parameters to meet. You must have:
- Footage that is 1080p (or at least 1080i)
- An NLE (non-linear editing system) capable of adjusting scale, position, and creating sequences in multiple formats.
- 1 billion dollars to donate to my paypal account (this is not mandatory, but preferred)
Understanding Formats
There are 3 main formats for HD footage: 1080p, 1080i, & 720p. The “i” stands for interlaced. The “p” stands for progressive scan. Here is a great explanation on the difference from Geek.com:
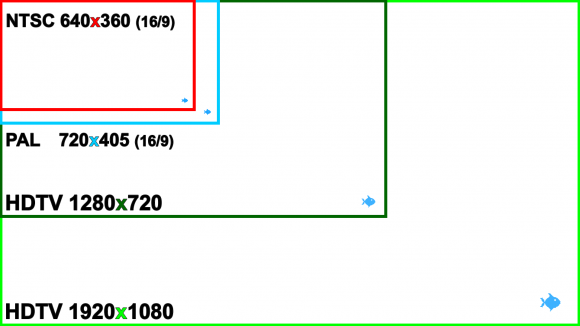
Like displays, resolution is the prime determiner of an HDTV’s picture clarity, and those crazy numbers roughly equate to vertical resolution. A television which is 720p, for example, will support video of up to 1280 pixels wide by 720 pixels tall. A television which is 1080p will support video of up to 1920 pixels wide by 1080 pixels tall.
But what about the trailing p and i? They refer to the television’s scan modes, but the good news is that you don’t really need to pay attention to that. If you’re curious, they refer to progressive scan and interlaced and refer to the way the screen is drawn, but virtually all modern HDTVs are progressive scan.
Simply put, progressive is the more appealing ‘visual’ format. 1080 has more pixels then 720, which equals a higher quality image, and overall larger size.
Taking Advantage
Now, since most cameras, including an iphone, can shoot 1080p these days, that is the format I usually shoot in. However, when the final video is going to be presented on the web, the difference of quality b/t 1080p and 720p is marginal at best. So I will always create a final sequence in 720p to give me a distinct advantage in editing. For example, I can:
- scale, rotate, and position the picture to a better framed shot.
- create keyframes to add movement to a shot by increasing/decreasing the size of the image.
- create keyframes to adjust the position, panning either from left to right or vice versa.
This adds some production value to a boring shot, similar to if you had a dolly or slider on set. However, the main advantage I finish in 720p has to do with cutting to music.
Editing to the Beat
Cutting to music is all about matching the visual footage to the beat. This is probably the simplest way to begin to learn how to edit. It gives you certain lengths to cut to, and forces you to make tough decisions, as well as get creative.
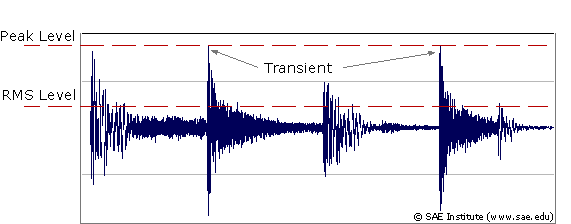
For any newbies, the simplest way to start is by stretching out the waveform of the song, and cutting at the peaks. This is usually the loudest sounds, and a good place to start. As you get more advanced, you learn how to cut on different sounds, and add visual transitions to match certain sounds such as a guitar riff.
When cutting event videos, the music usually tends to be upbeat. Without getting to technical, that means the timing between beats will be short, and to create the most engaging edit, it would be great to have a lot of footage and angles to cut to.
However, we all know this is never the case. Whether you do not have enough cameras, or you are a single man crew trying to capture an entire event, this is where my tip comes in handy. Essentially, it allows you to…
Double your footage
By taking 1080p sized footage into a 720p sequence, you are essentially doubling your footage. In a 720p sequence, a 1080p shot will fit the screen perfectly when scaled down to 67% (or approximately 2/3) of its original size. So now you have the same shots you started with, plus the ability to choose different close-ups in the original frame, scale, pan, and even rotate.
Having room to scale opens a myriad of options to play with. If a shot is a little crooked, you can easily fix it. If a shot is framed wrong, you can fix it. If it is ‘boring’, you can add excitement.
In this video, I lay out step by step the technique I use to take advantage of formats when cutting to music for event videos, or any live action piece. This includes how to:
- pick a song that builds.
- match the footage to the beat using waveforms
- cut on the ‘fast parts’ without making people throw up.
The NLE I use in the video is Adobe Premiere, however any NLE that meets the parameters at the top of this post will work. Check it out.
Feedback
Would love to hear if this tip has helped you at all, or if it was the biggest waste of time since the internet was created. Barring a harsh, overwhelmingly dismal reaction, look for more tips in the future.
Previous Video Editing Tips:
Action Jackson – How to cut on Action.
If you found this content valuable, please follow me on twitter or like us on facebook to receive future updates!


Great stuff. Looking forward to your next tutorials!
thanks Petr. Appreciate it!