This post is strictly for filmmakers, specifically of low budget films, but can be adapted to any professional environment for marketing purposes. As I mentioned in my post, 9 Essential Steps for Pre-Production, getting someone to photograph and video behind the scenes of a film can be crucial for promoting that film.
Let’s face it, one of the major hurdles for any new filmmaker is to be able to not only create something great, but also get people to watch it. One of the best strategies to do that is documenting the struggle to produce a film. It’s a great way to get people interested in the human story behind the story. Kickstarter is a perfect example of this. Many campaigns on there feature a series of shorts about the creation of the film. This keeps people engaged with your progress, and creates a desire to see the final product.
As low budget filmmakers though, there is always the issue of getting an extra videographer/photographer on set. For photography, it is essential to have raw photos for posters, marketing pieces, etc. So, for that, you are going to have to get a real photographer on set. Stills are so important b/c they capture the scenes in hi resolution.
However, for video, you do not need a cinematographer to shoot behind the scenes. It is more about the story, then the imagery. That is where the Ipad comes in. The following is a step by step process to turn your Ipad into the Ultimate Filmmaking promotional tool.
For this process to be effective, you must have an Ipad (duh!), $13 (currently), and a basic knowledge of editing.
Step 1: Setting up the Ipad
This first step is NOT essential, and is completely up to you and your budget. However, I thought it important to mention and recommend it. The idea for this process is to use the Ipad to film behind the scenes, cut it up into a video, and get it out to your social media channels.
If you are going to have your Ipad on set, I would suggest having a durable case that helps prevent it from being destroyed. Ipad’s can be fragile if not handled properly, and if you are a low budget filmmaker like me, chances are the last thing you want to have to do is replace your ipad.
I suggest the LifeProof Nuud case. It protects the Ipad from minor drops, falls, and even waterproofs it. Just for the record, this is what I use, so that is why I am suggesting it. I do not receive any affiliate income, or have any relationship with the vendor except as a consumer.
No matter which case you choose, the point is, if you are going to have this on set all the time, make sure to spend a little extra to protect your initial investment.
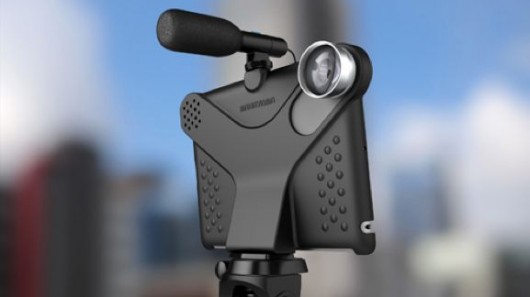
If video/audio quality takes precedence over durability, then you may want this case instead. I firmly believe that the story of the shoot is much more engaging then any visuals even the most decked out ipad can produce. However, if quality is your pet peeve, then this may add-on (pictured above) may be for you. The Makayama Movie Mount adds the capabilities to turn your ipad into a semi-pro digital camera. Be warned, that the lifeproof case below does not work with this add-on, so this would replace that step. For more info, check out the video below….
Step 2: Getting an Audience
If you are going to be documenting your film, you certainly are going to want an audience. Besides the normal social media channels like facebook and twitter, YouTube is a great place to make your home base. For each film, I set up a YouTube channel, and use that as the main feed for my final export. By using YouTube, it makes it easy to track your audience, rank higher on search engines, and pick up subscribers. That is why I prefer it over vimeo. While I am an avid fan of vimeo for professional productions, the BHS stuff I find to be more effective on a greater social network like youtube.
Even the big boys are doing this. Check out this behind the scenes YouTube channel for Skyfall.
Using this method in conjunction with facebook, twitter, kickstarter, indiegogo, and other social channels are great ways to build an audience. The better you do at this, the greater chance you have of selling &/or getting funding for your film. Don’t forget that YouTube tracks its audience geographical location, making it easy for a distributer to locate where there already is a market for your film.
Step 3: Shooting Video with the Ipad
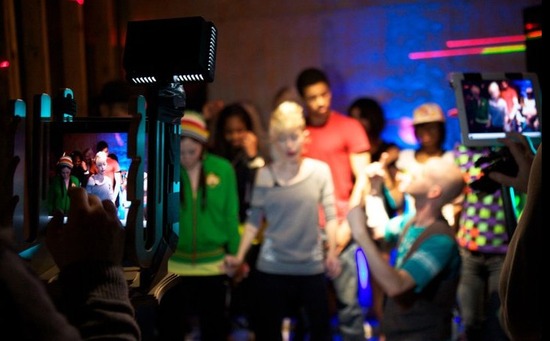
This may seem a little basic, but as I learned in Jiu Jitsu, it really is all about basics. During a shoot, the last thing on any director/producer’s mind is to shoot behind the scenes. Things can be hectic (duh!), and finishing the primary shoot (your film) certainly takes precedence. However, here are some tips for the best times to shoot.
- Rehearsals – Even if you are directing, take out the ipad and shoot them. I find this extremely useful to try different angles, ideas, and see how a ‘performance’ looks on camera before the real shoot.
- Down Time – I know, there is little if any. But there are two ‘down times’ in every shoot. The first is before the shoot, and the 2nd is after it wraps. Take 30 seconds to a minute to shoot yourself talking about the day’s goals at the beginning, and then your post shoot comments on how it all worked out. If you have anytime during the actual shoot, try to get someone from your crew, or cast, to do a quick interview.
- Invite Crew/Cast to Shoot – Actors/actresses certainly have a lot of down time. Since it is the ipad, and simple as hell to use, invite the cast and crew to use the ipad anytime they like to either interview themselves, or to shoot other stuff going on. Any footage, moments you capture, is always good to have as potential b-roll, etc.
Step 4: Editing BHS
Ok, so now after the first few steps, you have a bunch of footage to work with. No need to transfer it to a computer for post anymore. Instead, use an NLE system on the Ipad.
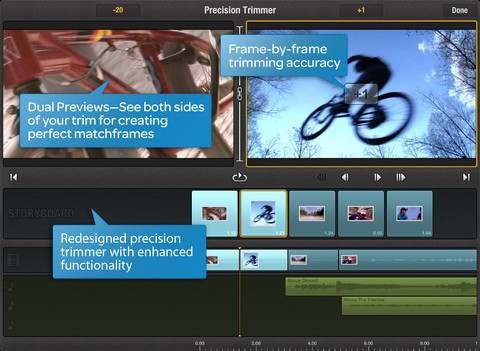
I particularly like Pinnacle Studio (used to be Avid Studio) app. I find it to be basic enough to use quickly, yet robust enough to create a decent BHS video.
The cool thing about the app is all the footage on your Ipad is already loaded into the library. It is a touch screen app, so most of the process is just drag and drop, and then use your finger to pick the best in/out points. There are also some basic drag & drop transitions. To adjust the volume, or add audio fades, you simply double tap the image on the Storyboard line.
I would say, depending on your skill level, you could create the entire video in less then an hour.
You can add music from your library on the ipad, however be sure not to use copyrighted music, as then you may not be able to upload it to YouTube or Facebook.
Once you have your edit complete, simply export. Using Pinnacle studio, you can export directly to youtube, facebook, your videos on the ipad, or even email the video. If you own the desktop version of Pinnacle Studion on a PC, then you can also export a version to be uploaded to there.
A few drawbacks to be prepared for. Pinnacle Studio does not allow for color correcting, scaling, or time remapping. For BHS work, I do not find this to be a problem. However, the future looks bright. As I write this, I just read an awesome article on NoFilm School about some new apps coming out that are similar to Instagram, but for video. That would make this process even easier. Check out this intro to the app Lightt for the iphone featured in that article:
Another obvious drawback is audio quality for interviews. If possible, I try to set up a space with the least amount of noise possible for the interviews. That could be in a separate room, a car, a quiet alley, etc. Shooting an interview in a noisy setting is pointless, as the lack of audio quality gets exposed and ruins it.
Step 5: Persistence
This final step is the easiest to understand and the hardest to execute. It is important to set time to create these promotional tools consistently. One or two BHS videos are not going to build an audience. Think of it as a reality show. Would you watch a reality show where the season was only 2 episodes long? Of course not. In fact, you may not even start watching the show till midway through the season, and then look to watch what you missed. This is important to understand for your ‘reality show’ as well.
Take the time to create the marketing tools needed. Just like any business, no matter what product/service you produce, if no one knows about it, its not going to be successful. Making a successful film, especially a low budget production, is excruciating work. No point to put all that effort only into the production, and none of it into the marketing.
As they say, you are only as strong as your weakest link.
If you found this content valuable, please follow me on twitter or like us on facebook to receive future updates!

Looking at this I NEED to get that lens and mount, the only issue I have with the IPad unless I am doing something wrong is all the footage comes out mirror imaged. So in the NLE you would I assume have to flip it again. Good post. Sharing.
Thanks! I do not have that issue with the footage in the NLE. I did not have to flip anything.
Check out this link: https://discussions.apple.com/thread/2780825?start=0&tstart=0
“Front facing camera when viewing the preview the image is flipped. When viewing the photo taken from the front facing camera the photo is displayed correctly, not flipped. Same with video.
On the other hand, the back facing camera the imagine is correct both in the preview and viewing the photo. Same with video…”
hmm maybe something is wrong with mine, even when i view the actual photo its still flipped, on the back camera its fine, but the front facing camera always is flipped. not sure whats up with it.